Battery switch on travel trailer function is crucial for managing your RV’s power. Understanding how it works is key to preventing electrical issues and maximizing your camping experience. This guide will walk you through the different types of switches, their pros and cons, troubleshooting tips, and important safety precautions. We’ll cover everything from basic wiring to integrating your switch with other power systems like solar panels and inverters.
Think of your travel trailer’s battery switch as the main power control center. It allows you to isolate your house batteries from the rest of the system, preventing accidental drains and protecting your equipment. Properly using and maintaining this switch is vital for keeping your lights on, your fridge cold, and your adventures uninterrupted.
Understanding Battery Switch Functionality in Travel Trailers
A battery switch is a crucial component in a travel trailer’s electrical system, allowing you to control the flow of power from your house batteries to the trailer’s appliances and systems. Understanding its function and proper usage is essential for safe and reliable operation. This section details the different types of switches, wiring diagrams, connection procedures, and power flow.
Types of Battery Switches
Travel trailers commonly use two main types of battery switches: a simple on/off switch and a more sophisticated multi-position switch. The simple on/off switch provides a straightforward method to disconnect the house batteries entirely. The multi-position switch offers more control, often allowing selection between the house batteries, the tow vehicle’s charging system, or a combination of both. Some advanced switches even incorporate features like battery monitoring.
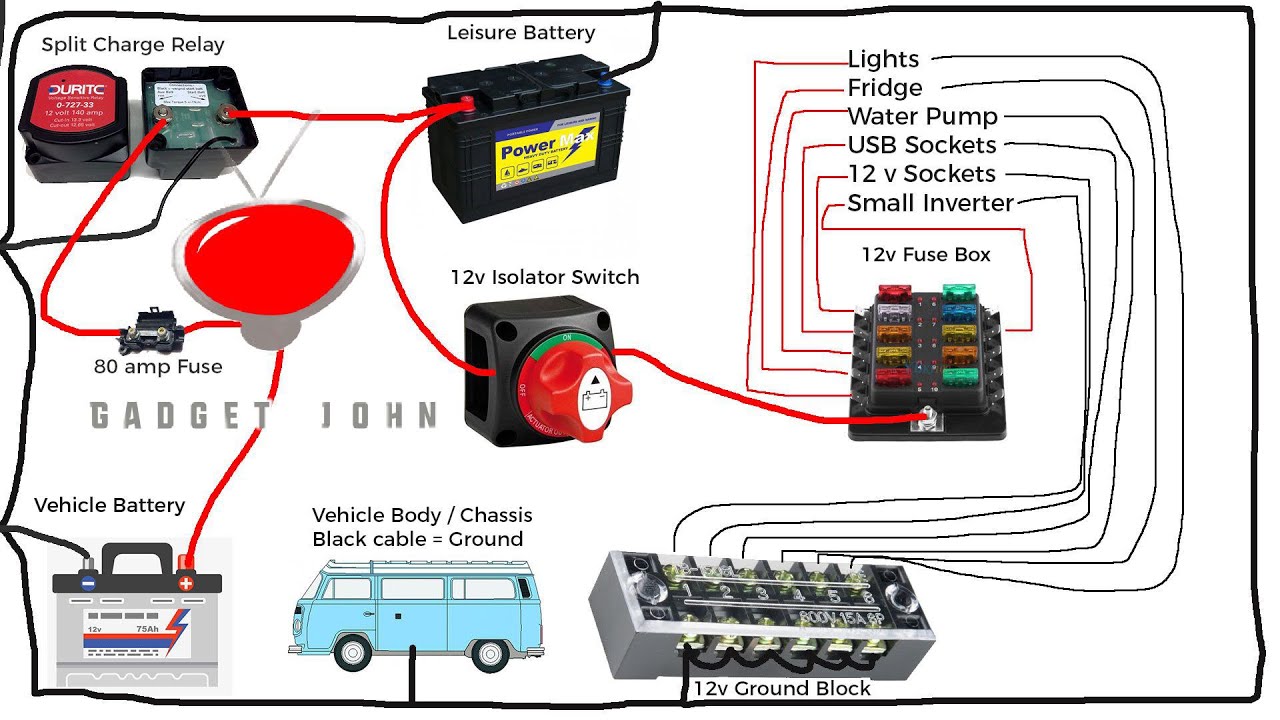
Typical Wiring Diagrams for Battery Switch Setup
A basic battery switch setup involves connecting the positive (+) cable from the house battery to the switch’s input. The output from the switch then connects to the positive bus bar that feeds power to the trailer’s 12V system. The negative (-) battery cable typically connects directly to the chassis ground, bypassing the switch for safety reasons. More complex setups may involve multiple batteries, solar panels, and battery chargers, each requiring its own wiring considerations.
A multi-position switch would have additional terminals and wiring to accommodate the different power sources and load configurations. For instance, one position might connect the house batteries to the trailer, another might connect the truck’s charging system to the batteries, and a third might isolate the batteries completely. A detailed diagram is crucial for troubleshooting and maintenance.
Imagine a diagram showing the battery, the switch with its terminals labeled, the positive bus bar, and the various loads (lights, water pump, etc.) connected to the bus bar. The wiring paths would be clearly shown, indicating the flow of current in different switch positions.
Connecting a Battery Switch
Before starting any electrical work, always disconnect the negative (-) battery cable to prevent accidental short circuits. This is a crucial safety precaution.
1. Identify the Battery Switch Terminals
Locate the terminals labeled “Battery,” “Load,” and “Ground” (or similar designations).
2. Connect the Positive Cable
Attach the positive (+) cable from the house battery to the “Battery” terminal on the switch. Secure the connection with a suitable bolt and nut.
3. Connect the Load Cable
Connect the positive (+) cable running to the trailer’s 12V system (the load) to the “Load” terminal on the switch. Ensure this connection is also secure.
4. Connect the Negative Cable
Connect the negative (-) cable from the house battery directly to the trailer’s chassis ground. Do not connect it to the switch.
5. Test the Connection
Turn the switch on and check if the 12V system in your trailer is functioning correctly.
Power Flow Diagram
A simple flowchart can illustrate power flow.[Imagine a flowchart here. The top would be the battery. One branch would go to a switch, then to the trailer loads. The other branch would be a direct connection to the trailer loads, perhaps for a simple on/off switch. The switch would have two states: ON and OFF.
The ON state would show the power flowing through the switch to the trailer loads. The OFF state would show the power path blocked by the switch.] In the “ON” state, power flows directly from the battery, through the switch, and to the trailer’s electrical system. In the “OFF” state, the switch interrupts the flow of power, preventing any current from reaching the trailer’s appliances.
Battery Switch Types and Their Advantages/Disadvantages
Choosing the right battery switch for your travel trailer is crucial for managing power effectively and safely. Different types offer varying levels of control and complexity, each with its own set of pros and cons. Understanding these differences will help you select the best option for your needs.
Battery Switch Types
The most common types of battery switches used in travel trailers are single-pole, double-pole, and double-pole double-throw switches. Each offers a different level of control over your battery banks and the appliances they power.
| Switch Type | Description | Advantages | Disadvantages |
|---|---|---|---|
| Single-Pole | Controls one battery at a time. Often used for a single house battery or to isolate a single battery for maintenance. | Simple, inexpensive, easy to install. | Limited functionality; only allows for one battery to be used at a time. Not suitable for systems with multiple batteries or complex power needs. |
| Double-Pole | Controls two batteries independently, allowing you to switch between them or use both simultaneously. Commonly used to manage a house battery and a starting battery. | Increased control over two batteries; allows for combined power or individual battery usage. Relatively simple to understand and operate. | More complex than a single-pole switch; requires more wiring. Still limits the combined output to the sum of each battery’s capacity. |
| Double-Pole Double-Throw (DPDT) | Offers the most control, allowing you to switch between two sources of power (e.g., shore power and batteries) or to connect both simultaneously. Often used in more complex systems with generators and solar panels. | Provides maximum flexibility and control over multiple power sources; enables seamless transitions between different power sources. Allows for combined power from multiple sources. | Most expensive and complex to install; requires more wiring and a deeper understanding of electrical systems. Can be more challenging to troubleshoot if problems arise. |
Choosing the Right Switch
The best type of battery switch depends on your travel trailer’s electrical system and your power needs. For a simple setup with only one house battery, a single-pole switch is sufficient. If you have a separate starting battery and a house battery, a double-pole switch provides better control. For more complex setups with multiple batteries, a generator, and solar panels, a DPDT switch offers the most flexibility.
Consider the number of batteries, the power sources, and the complexity of your system when making your decision. A properly sized switch is also critical for safety; choosing a switch with an amperage rating sufficient for your system is essential.
Troubleshooting Common Battery Switch Issues
Your travel trailer’s battery switch is a critical component, and problems can leave you stranded. Understanding how to troubleshoot common issues can save you time, frustration, and potentially a costly repair. This section Artikels the most frequent problems and provides clear steps to diagnose and resolve them.
Identifying Common Battery Switch Problems, Battery switch on travel trailer function
Several issues can arise with your travel trailer’s battery switch. The most common include a complete lack of power to the trailer’s appliances, blown fuses within the switch itself or in related circuits, and intermittent operation where the power comes and goes unpredictably. These problems can stem from a variety of causes, including corroded connections, faulty wiring, a malfunctioning switch, or even a dead battery.
So, you’re an audiophile who loves to travel? Awesome! Check out this guide on setting up your audiophile travel setup for the best sound on the go. It’s crucial to prioritize portability without sacrificing quality. Then, if you’re hitting the road in an RV, understanding your battery switch on travel trailer function is key to keeping your music playing – and your lights on! Knowing how to manage your power is just as important as packing your favorite headphones.
Troubleshooting Steps for Battery Switch Issues
Troubleshooting begins with a visual inspection. Carefully examine the battery switch for any obvious signs of damage, such as loose wires, corrosion on the terminals, or physical damage to the switch housing. Pay close attention to the wiring connections; loose or corroded connections are a frequent culprit. Clean any corrosion using a wire brush and battery terminal cleaner.
Tighten any loose connections. If you find any damaged wires, replace them immediately.Next, check the fuses both within the battery switch itself (if it has an internal fuse box) and in the main fuse panel of your trailer. A blown fuse will typically show a broken filament within the clear glass casing. Replace any blown fuses with fuses of the same amperage rating.
If a fuse blows immediately after replacement, it indicates a short circuit in the wiring that needs further investigation.If the visual inspection and fuse check don’t reveal the problem, it’s time to use a multimeter.
Safely Testing the Battery Switch with a Multimeter
Before using a multimeter, ensure you understand its functions and safety precautions. Always disconnect the negative battery cable before performing any electrical tests.To test the switch, set your multimeter to the voltage setting (DC volts). First, measure the voltage directly at the battery terminals. You should get a reading close to 12 volts (or 24 volts for dual battery systems).
If you don’t, the problem lies with the battery, not the switch.Next, with the battery switch in the “off” position, measure the voltage at the output terminals of the switch. You should read near zero volts. If you get a voltage reading, there’s a problem with the switch itself, or a short circuit.Finally, switch the battery switch to the “on” position and measure the voltage again at the output terminals.
You should get a voltage reading close to the battery voltage. If not, there is a problem with the switch or wiring between the switch and the output.
Preventative Maintenance for Extended Battery Switch Lifespan
Regular preventative maintenance is key to extending the life of your battery switch and preventing costly repairs.
- Regular Inspection: Inspect the battery switch and its connections at least once a year, or more frequently if you use your travel trailer often in harsh environments.
- Clean Connections: Clean battery terminals and switch connections with a wire brush and terminal cleaner to remove corrosion.
- Tighten Connections: Ensure all connections are securely tightened. Loose connections can lead to overheating and failure.
- Protect from the Elements: Protect the battery switch from excessive moisture, dirt, and other environmental factors. Consider using a waterproof cover.
- Proper Wiring: Ensure proper wiring practices are followed when installing or replacing the battery switch.
Battery Switch and Power Management Systems
Your travel trailer’s battery switch is a central component in a larger power management system. Understanding how it interacts with other systems like solar panels, inverters, and shore power is crucial for efficient and safe operation. This section will explore these interactions, highlighting safety precautions and potential troubleshooting scenarios.The battery switch acts as a crucial gatekeeper, controlling the flow of power from your house batteries to the trailer’s DC systems.
It doesn’t directly manage AC power from shore power or an inverter, but its state significantly impacts how these systems function. For example, if the switch is off, the house batteries won’t supply power to the trailer’s 12V lights or water pump, even if the solar panels are charging the batteries or shore power is connected.
Interaction with Other Power Systems
A properly functioning battery switch allows for a seamless integration of various power sources within your travel trailer. When shore power is connected, the converter charges the batteries, and the trailer runs primarily on AC power. However, the DC systems still draw power from the batteries, which are also being topped off. Solar panels add another layer of charging, supplementing the converter and ensuring batteries stay topped up even when shore power isn’t available.
The inverter converts the DC power from the batteries into AC power for appliances requiring it, but only when the battery switch is turned to the appropriate position.
Grounding and Safety Precautions
Proper grounding is paramount for safety when working with any electrical system, especially one involving batteries. Always ensure that the negative battery terminal is properly grounded to the trailer’s chassis. This prevents stray voltage and minimizes the risk of electric shock. Before working on the battery switch or any related wiring, always disconnect the negative battery cable to prevent accidental shorts.
Wear appropriate safety glasses and gloves.
Effects of a Faulty Battery Switch
A faulty battery switch can manifest in several ways, significantly impacting other systems. For instance, a switch that fails in the “off” position might prevent your batteries from charging, even with shore power or solar panels connected. Conversely, a switch that fails in the “on” position could lead to a constant drain on your batteries, potentially leaving you without power when you need it.
In some cases, a malfunctioning switch could cause a short circuit, leading to blown fuses or even more serious damage. A switch that doesn’t properly isolate the batteries could lead to parasitic drain even when shore power is connected.
Power Pathways Diagram
Imagine a diagram with several labeled components:* Shore Power Inlet: The point where external AC power enters the trailer.
Converter
Converts AC shore power to DC power for charging batteries.
Solar Panels
Provide DC power to charge batteries.
Battery Switch
Controls the flow of DC power from the batteries.
House Batteries
Store DC power.
Inverter
Converts DC power from the batteries to AC power.
12V DC Loads (Lights, Pump)
Draw power directly from the batteries via the battery switch.
120V AC Loads (Air Conditioner, Microwave)
Draw power either from shore power or the inverter.The arrows show the flow of power. Shore power feeds the converter, which charges the batteries. Solar panels also charge the batteries. The battery switch controls the flow of power from the batteries to the 12V DC loads. The inverter converts battery power to AC power for the 120V AC loads, all contingent on the battery switch being in the correct position.
A faulty switch can interrupt any of these pathways.
Safety Precautions When Using a Battery Switch

Working with batteries, especially in a travel trailer where space is often limited and conditions can be less than ideal, requires careful attention to safety. Incorrect usage of a battery switch can lead to serious consequences, including electric shock, fire, and damage to your trailer’s electrical system. Understanding and implementing proper safety measures is crucial for preventing accidents and ensuring a safe and enjoyable camping experience.Working with electricity always carries inherent risks.
Battery switches, while relatively simple devices, are connected to powerful sources of DC electricity. Improper handling can result in serious injury or damage. Even seemingly minor mistakes can have significant repercussions, such as accidentally short-circuiting the battery, creating sparks, and potentially igniting flammable materials near the battery compartment. This section Artikels the necessary precautions to ensure your safety while working with your travel trailer’s battery switch.
Personal Protective Equipment (PPE)
When working with any electrical component, including a battery switch, appropriate personal protective equipment (PPE) is essential. This protects you from potential hazards like electrical shocks, sparks, and battery acid splashes. Always wear safety glasses to protect your eyes from flying debris or battery acid splashes. Consider wearing gloves to protect your hands from cuts, abrasions, and acid exposure.
So, you’re an audiophile who loves to travel? Awesome! Check out this guide on creating the perfect audiophile travel setup to ensure your ears are always happy on the road. It’s all about packing light but smart. And speaking of power, if you’re hitting the road in an RV, understanding your battery switch on travel trailer function is crucial for keeping your devices charged and your adventures going.
Knowing how to manage your power is just as important as your tunes!
Insulated tools should be used whenever possible to minimize the risk of electric shock. Proper footwear, ideally with rubber soles, should also be worn to further reduce the risk of electric shock.
Disconnecting Power
Before undertaking any work on your battery switch, the first and most crucial step is to disconnect the power. This involves turning off the battery switch itself, completely isolating the batteries from the trailer’s electrical system. Additionally, if working directly with the batteries, disconnect the negative (-) terminal first, followed by the positive (+) terminal. This prevents accidental short circuits.
After completing your work, reconnect the positive (+) terminal first, then the negative (-) terminal. Always double-check that the power is indeed disconnected before starting any work.
Safety Warnings and Recommendations
- Never work on the battery switch or batteries in wet or damp conditions. Moisture increases the risk of electric shock.
- Ensure adequate ventilation in the battery compartment. Batteries produce hydrogen gas, which is highly flammable. Proper ventilation minimizes the risk of explosion.
- Keep flames and sparks away from the battery compartment. Hydrogen gas can easily ignite.
- Always use the correct tools for the job. Improper tools can damage the battery switch or create hazards.
- Never attempt to repair or modify the battery switch yourself unless you possess the necessary expertise. Improper repairs can lead to malfunctions and safety hazards.
- Inspect the battery switch and connections regularly for corrosion, loose connections, or damage. Address any issues promptly.
- Store corrosive materials such as battery acid safely and away from the battery switch.
- Familiarize yourself with the location of your trailer’s circuit breakers and know how to use them in case of an emergency.
For complex issues or if you are unsure about any aspect of your battery switch, always consult a qualified technician. Improper handling can lead to serious injury or damage.
Impact of Battery Switch on Travel Trailer Appliances: Battery Switch On Travel Trailer Function
Your travel trailer’s battery switch is the gatekeeper of power from your house batteries to your appliances. Understanding how it affects different systems is crucial for efficient energy management and preventing issues. This section will explain how the switch influences various appliances and how you can optimize power usage.
The battery switch controls the flow of DC power from your trailer’s batteries to the 12-volt appliances. AC appliances, powered by shore power or a generator, are unaffected by the battery switch. However, the switch plays a vital role in how long your 12-volt appliances can run off battery power alone. The power demands of each appliance vary greatly, and this variation affects how long your batteries will last before needing a recharge.
Power Requirements of Travel Trailer Appliances
Different appliances consume varying amounts of power. Lights generally draw less power than a refrigerator or water pump. A typical LED light might use only a few watts, while a refrigerator can consume anywhere from 30 to 100 watts depending on its size and efficiency. The air conditioner, if running on 12V DC, will be a significant power draw, easily exceeding 100 watts.
Understanding these differences allows you to prioritize appliance usage based on your battery capacity and anticipated duration off-grid.
Managing Power Consumption with the Battery Switch
Efficient power management involves strategic use of the battery switch. For example, if you’re parked and connected to shore power, you can leave the battery switch on to charge your batteries and power your 12-volt appliances from the shore power via the converter. However, when boondocking (off-grid), you’ll want to be mindful of power consumption. Turning off the battery switch when not in use helps to conserve battery power.
Prioritize essential appliances, like interior lighting, and limit the use of high-power consumers like water pumps and refrigerators, especially during periods of limited sunlight for solar panel charging. Consider using propane for cooking and heating instead of electric options to further conserve battery power.
Power Consumption and Battery Switch Compatibility
| Appliance | Typical Power Consumption (Watts) | Battery Switch Impact |
|---|---|---|
| LED Interior Lights | 5-15 | Minimal impact; can run for extended periods on battery power. |
| Refrigerator (12V DC) | 30-100 | Significant impact; shorter runtime on battery power. Consider using a propane refrigerator for extended boondocking. |
| Water Pump | 10-20 | Moderate impact; use sparingly when off-grid. |
| Air Conditioner (12V DC – less common) | 100+ | Very significant impact; will drain batteries quickly. Generally not recommended for extended boondocking unless using a large battery bank and solar panels. |
| Fans | 10-30 | Moderate impact; can be used for a reasonable amount of time off-grid. |
| TV (12V DC) | 20-50 | Moderate to significant impact, depending on size and usage. |
Mastering your travel trailer’s battery switch isn’t just about flipping a switch; it’s about understanding your RV’s electrical system and ensuring safe, reliable power. By understanding the different switch types, troubleshooting common problems, and prioritizing safety, you can confidently manage your trailer’s power and enjoy worry-free camping trips. Remember to consult a professional if you encounter any complex issues.
Essential FAQs
What happens if I leave my battery switch on all the time?
Leaving your battery switch on constantly can drain your batteries, especially if there’s a parasitic drain somewhere in your RV. It’s best practice to turn it off when not using your trailer for extended periods.
How do I know if my battery switch is bad?
Symptoms of a bad battery switch include no power to your appliances, blown fuses, or intermittent power. A multimeter can help diagnose the issue by checking for voltage and continuity.
Can I install a battery switch myself?
While possible, installing a battery switch requires basic electrical knowledge and safety precautions. If unsure, it’s best to consult a professional RV technician.
What type of battery switch is best for my travel trailer?
The best battery switch depends on your needs and setup. A double-pole, double-throw switch offers the most flexibility, but a simpler single-pole switch might suffice for smaller trailers.
